E-MC^2
geek

Vap0r.net

Dish Hack

Extend the recording time of your Dishplayer 7100 to about 20-25 hours!

This works on the Dishplayer Model 7100 with the web tv garbage. Here are some brief instructions with a few pictures, its very easy to complete but you will also void the warranty on your player. Legal Mumbo-  By reading further you agree to not hold the author responsible for anything that goes wrong.  I've done several units with no problems but things can go wrong.  The biggest potential for disaster is the power required to run the beefier drive may overload the power supply, causing the unit to cease to exist.  I plan on testing several drives and I'll post the current draw on each one.  Until then, here are the brief instructions:

You will need a phillips head screwdriver and of course the new Hard Drive.  I went with a new Maxtor 30 gig 7200 RPM Model 53073H6.  I'll try and get a list  of drives that I have tested put up soon. The Maxtor is a very good drive and I  don't care much for Western Digital but its up to you! The 30 gig will give  you  about 20 hours of recording time instead 5. Unplug your player, and be sure you want to chance this!  Here we go.....

Remove the four black screws on the back of the machine and the two screens on both sides of the receiver (total of 8)

Remove the cover by pushing it towards the back of the unit. Carefully remove the power cable from the drive

Remove the (3) three drive screws that hold the cage in place

Carefully remove the IDE cable from the drive

Flip the drive cage over and remove the four silver screws. Remove the old drive and place the new one on the cage

Carefully connect the IDE cable to the drive. This cable is twisted and it must be reinstalled with the twist in it.  A good rule to use is that  the red stripe on the wire will go closest to the power cable.

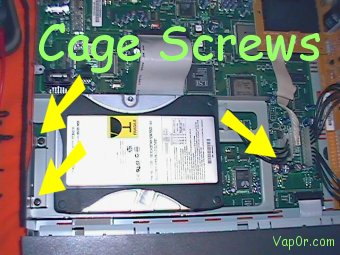
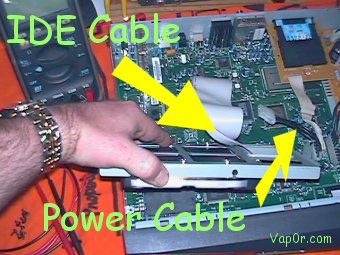
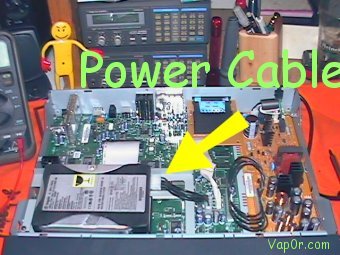
Install the cage and secure it with the three screws.  Now reinstall the power cable ( This is vapor-proof and cannot b put on backwards!)

Reinstall the cover by placing it on the unit with about an inch hanging over the back, then slide it forward. Install all (8) eight screws.  Reconnect your coax cablees, phone line and then plug the unit in. Power up the unit and it will inform you that its connecting to download an update.  Now is a good time to send me an email and let me know how it went.  This update will take around 30 minutes then power down the unit and start it back up.  Your schedule for recording will be gone, you will have to  enter in the programs you want record back in.  Call your friends and let them know how your Dish Player will record over twenty hours of digital video now!

Its interesting to note that the bootstrap in the EEPROM will automatically format and partition your new drive. There is no need for you to do it manually!

Now if your truly a die hard geek, connect the old drive up to your computer and take a look at the data that is stored on it. Some pretty cool stuff on it!

Id really like to hear from everyone that tries this.  Send me an email or a postcard!
Also feel free to include the Hard Drive Manufacturer and Model that you used..

Mail vap0r@insightbb.com


Next Project? Get this ATI Radeon Graphics Card to work in the Dishplayer!!

Enjoy!

[Home] [My Work] [Dish Hack] [Linux] [Firewall] [Netware] [TCP/IP] [Hack] [NSA] [Files] [Pix] [Hardware] [Switch Traf] [Magic] [Night Sky] [Weather] [Freq Scan] [IDS] [Rush] [.] [Prophet] [Entropia] [Electronics] [LHC] [Instinct] [Instinct Fix] [NAS] [iPhone]


Click for Bloomington, Illinois Forecast